graph TD
A[Edit Files] --> B[Stage]
B --> C[Commit]
C --> D{Collaborating?}
D -->|Yes| E[Pull First]
D -->|No| F[Push]
E --> F
F --> A
Getting Started with R
RStudio, Projects, and Version Control with Git
Zahid Asghar, School of Economics, QAU
Organised by the SDPI D4D Program
2026-08-30
Welcome!
Today’s Focus
- Why R and why it matters for research and data analysis
- Setting up a productive workflow with RStudio
- Understanding R Projects
- Version control basics with Git and GitHub
Why R?
R in Data Analysis and Research
R is purpose-built for statistical computing
Strengths:
- Designed by statisticians for statistics
- Massive ecosystem of specialized packages
- Industry-leading data visualization (ggplot2)
- Active development community
- Excellent reproducibility tools
- Free and open source
Perfect for:
- Data analysis and statistics
- Scientific visualization
- Reproducible research
- Reporting and documentation
- Teaching and collaboration
R vs. Other Languages
Different tools for different jobs:
| Language | Best For | Speed | Learning Curve |
|---|---|---|---|
| R | Statistics, data science, visualization | Moderate | Gentle |
| Python | General programming, ML, automation | Fast | Gentle |
| Julia | High-performance computing | Very Fast | Moderate |
| Stata | Economics, panel data | Moderate | Gentle |
| MATLAB | Engineering, simulations | Fast | Moderate |
Pro Tip
Most researchers use multiple tools. R excels at statistical analysis and creating publication-quality figures.
What You Can Create with R
- Publication-quality static graphics (ggplot2)
- Interactive plots (plotly, leaflet)
- Maps and spatial data visualization
- Statistical diagrams and networks
- Research papers (Quarto/RMarkdown)
- Presentations (like this one!)
- Books and websites
- Dashboards and apps
- Statistical modeling
- Machine learning
- Causal inference
- Survey experiments
- Time series analysis
Example: Data Visualization
library(ggplot2)

ggplot(mtcars, aes(x = wt, y = mpg)) +
  geom_point(aes(color = factor(cyl)),
             size = 3, alpha = 0.7) +
  geom_smooth(method = "lm",
              se = FALSE,
              color = "darkblue") +
  labs(title = "Car Weight vs. Fuel Efficiency",
       x = "Weight (1000 lbs)",
       y = "Miles per Gallon",
       color = "Cylinders") +
  theme_minimal(base_size = 12)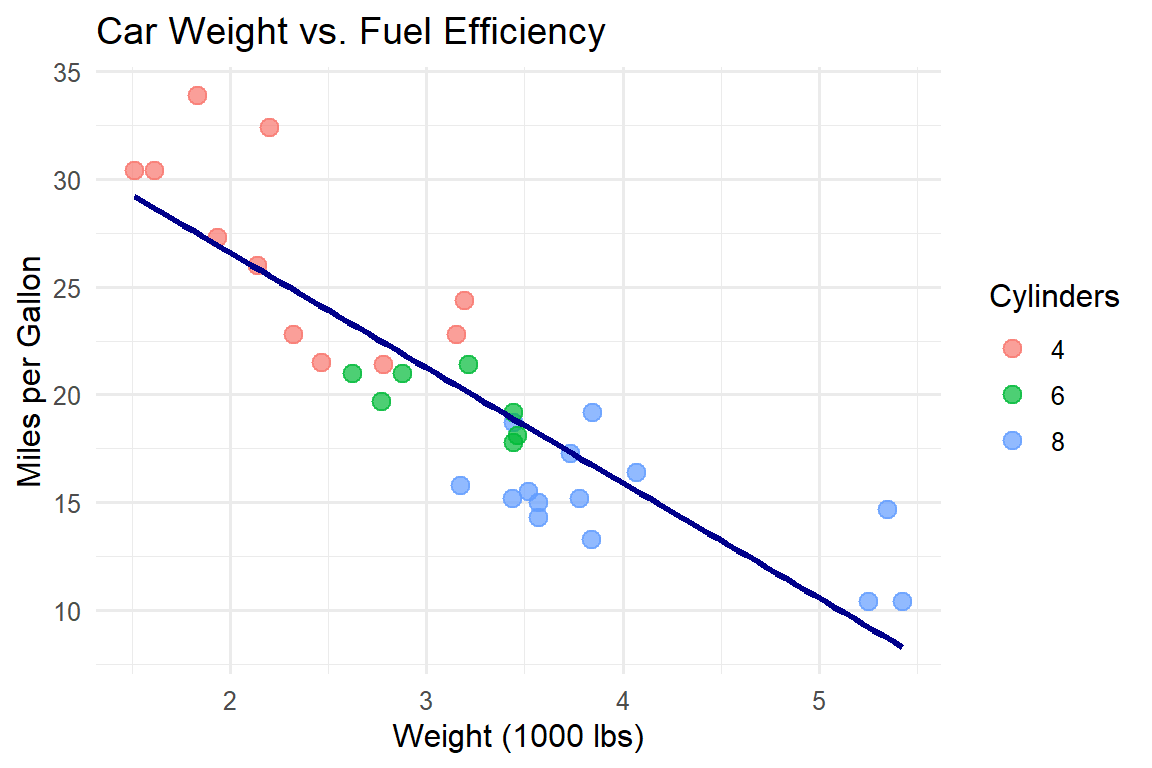
IDEs for R
What is an IDE?
IDE = Integrated Development Environment
An IDE brings together all the tools you need:
- Code editor with syntax highlighting
- Console for running code interactively
- Environment/variable viewer
- Plot and visualization display
- Package management
- Debugging tools
- Version control integration
- Help documentation
Two Popular IDEs for R
RStudio
The Traditional Choice
- Industry standard since 2011
- Mature and feature-rich
- Excellent for R-specific workflows
- Strong package development tools
- Free and open source
- Great documentation and community
Best for: - Pure R projects - R package development - Teaching R - Traditional workflows
Positron (New!)
The Modern Alternative
- Built by Posit (makers of RStudio)
- Launched in 2024
- Based on VS Code architecture
- Multi-language support (R, Python)
- Modern interface
- Lightning fast
- Still in beta
Best for: - Multi-language projects (R + Python) - Users familiar with VS Code - Modern development workflows - Those wanting cutting-edge features
For This Course
We’ll primarily use RStudio for demos, but everything works in Positron too! Choose what feels comfortable.
RStudio Interface
Four Main Panes:
- Source (top-left)
- Write and edit scripts
- RMarkdown/Quarto documents
- Console (bottom-left)
- Execute commands
- See output
- Environment (top-right)
- View loaded data/objects
- Command history
- Files/Plots/Help (bottom-right)
- File browser
- Plot viewer
- Package manager
- Help documentation
Note
You can customize pane layout in Tools > Global Options > Pane Layout
Getting Positron (Optional)
Want to try the new IDE?
Download:
- Visit github.com/posit-dev/positron
- Click “Releases” on the right
- Download for your OS
- Install like any other app
Key Features:
- Same core functionality as RStudio
- VS Code extensions compatibility
- Better performance
- Modern UI/UX
Interface:
- Similar panes to RStudio
- Command palette (
Ctrl/Cmd + Shift + P) - Integrated terminal
- Git support built-in
- Multiple language support
Status:
- Currently in beta
- Actively developed
- Free and open source
- Growing community
Recommendation
Stick with RStudio for learning, explore Positron once comfortable. Both are excellent!
Recommendation
Stick with RStudio for learning, explore Positron once comfortable. Both are excellent!
RStudio vs Positron: Quick Comparison
| Feature | RStudio | Positron |
|---|---|---|
| Maturity | Stable (10+ years) | Beta (2024+) |
| Languages | Primarily R | R + Python + more |
| Learning Curve | Gentle | Gentle (familiar if you know VS Code) |
| R Package Dev | Excellent tools | Good, improving |
| Extensions | R-specific | VS Code marketplace |
| Performance | Good | Faster |
| Community | Large, established | Growing |
| Documentation | Extensive | Developing |
| Best Use Case | Pure R projects | Multi-language projects |
Note
Both are made by Posit (formerly RStudio Inc.) and both are free! Your choice depends on your workflow and preferences.
RStudio Tips
Keyboard Shortcuts (save your wrists!)
| Action | Windows/Linux | Mac |
|---|---|---|
| Run current line | Ctrl + Enter |
Cmd + Enter |
Assignment operator <- |
Alt + - |
Option + - |
Pipe operator %>% |
Ctrl + Shift + M |
Cmd + Shift + M |
| Comment/uncomment | Ctrl + Shift + C |
Cmd + Shift + C |
Tip
Type Alt + Shift + K (Windows) or Option + Shift + K (Mac) to see all shortcuts
Scripts and Documents
Two Ways to Write Code
R Scripts (.R)
Use for:
- Data processing pipelines
- Function definitions
- Quick analyses
Why Quarto/RMarkdown?
Reproducible Research Made Easy
- Code + Text in One Place
- No copy-paste errors
- Analysis and writeup together
- Multiple Output Formats
- PDF (via LaTeX)
- HTML (with interactive elements)
- Word (for collaboration)
- Presentations (like this!)
- Truly Reproducible
- Re-run entire analysis with one click
- Changes automatically propagate
- Perfect for revisions
Quarto Document Structure
Important
YAML header (between ---) controls document metadata and output format
R Projects
The Problem with Working Directories
R Projects to the Rescue ✅
R Projects solve path problems
When you open an .Rproj file:
RStudio starts fresh R session
Working directory automatically set to project folder
Use relative paths that work anywhere:
Project-specific settings saved
Easy to zip and share entire project
Creating an R Project
Three common ways:
File > New Project > New Directory- Choose project type
- Select location
- Click “Create Project”
File > New Project > Existing Directory- Navigate to folder
- Click “Create Project”
File > New Project > Version Control > Git- Paste repository URL
- Choose location
- Click “Create Project”
Organizing Your Project
Recommended structure:
my-project/
├── my-project.Rproj
├── README.md
├── data/
│   ├── raw/
│   └── processed/
├── scripts/
│   ├── 01-clean-data.R
│   └── 02-analyze.R
├── documents/
│   └── paper.qmd
├── figures/
└── output/
Pro Tips
- Use meaningful names
- Number scripts in order
- Keep raw data separate (never edit!)
- Document everything in README
Version Control with Git
Workshop Schedule Note
Today we’re introducing Git/GitHub concepts and basic setup. We’ll do a deep dive into Git workflows on Day 2/3 of the workshop with hands-on practice and advanced techniques.
What is Version Control?
Track every change to your project over time
Without version control:
thesis_final.docx
thesis_final_v2.docx
thesis_final_FINAL.docx
thesis_final_FINAL_revised.docx
thesis_final_actual_final.docx
😱 Which one is current?
😱 What changed between versions?
😱 Who made what changes?
With version control:
thesis.docx✅ Complete history saved
✅ See all changes
✅ Revert to any version
✅ Multiple people can work
✅ Track who did what
Git Basics
Git = Distributed Version Control System
- Tracks changes to files over time
- Works locally on your computer
- Creates “snapshots” (commits) of your project
- Lets you explore different versions
- Enables collaboration
- Industry standard for code projects
Note
Git is powerful but has a learning curve. We’ll focus on essential operations.
GitHub vs. Git
Git
- Version control software
- Runs on your computer
- Tracks file changes
- Command-line tool
- Works offline
GitHub
- Online platform
- Built on top of Git
- Cloud storage for repositories
- Web interface
- Collaboration features
- Social coding platform
Tip
Think of Git as your local diary, GitHub as publishing that diary online
Why Use Git for Research?
- Never lose work
- Complete project history
- Restore any previous version
- Experiment safely
- Understand what changed
- See exact changes between versions
- Trace when bugs introduced
- Document decision process
- Collaborate effectively
- Multiple people work simultaneously
- Merge contributions automatically
- Clear attribution of work
- Publish and share
- Make research reproducible
- Share code publicly
- Get feedback and contributions
Getting Started with Git
Initial Setup
First time only:
Note
Use the same email as your GitHub account!
Create Your First Repository
On GitHub:
- Go to github.com/new
- Name your repository (e.g., “test-project”)
- Choose public or private
- ✅ Check “Add a README file”
- Click “Create repository”
Important
Initialize with README so repository isn’t empty
Clone Repository to Your Computer
In RStudio:
File > New Project > Version Control > Git- Paste repository URL from GitHub
- Choose where to save
- Click “Create Project”
You now have:
- Local copy on your computer
- Connected to GitHub (remote)
- Ready to start working!
The Git Workflow
Today: Overview Only
We’re covering Git fundamentals today. Day 2/3 will include:
- Detailed workflow demonstrations
- Hands-on practice with your projects
- Troubleshooting common issues
- Advanced collaboration techniques
- Branch management strategies
For now, focus on understanding the concepts!
Four Essential Operations
1. Stage (Add)
Select which changes to save
2. Commit
Save staged changes with message
3. Pull
Download changes from GitHub
4. Push
Upload your commits to GitHub
The Commit Cycle
Edit your files as normal
Click checkboxes next to changed files in Git pane
Click “Commit”, write message:
Add linear regression analysis

- Import survey data
- Run treatment effect model
- TODO: Add control variables
Click “Push” to sync with GitHub
Writing Good Commit Messages
❌ Bad Messages
update
fixed stuff
asdf
final version
changes
more changes
Problems:
- Not descriptive
- Future you won’t understand
- Can’t search history
✅ Good Messages
Add regression models for main analysis

Fix missing data handling in cleaning script

Update Figure 2 with reviewer comments

Remove deprecated ggplot2 syntax
Why better:
- Explains what changed
- Explains why (if needed)
- Searchable
- Professional
RStudio Git Interface
In the Git pane you can:
- 📋 See which files changed (Status column)
- ☑️ Stage/unstage files (checkboxes)
- 💬 Commit changes (Commit button)
- 📥 Pull from GitHub (Pull button)
- 📤 Push to GitHub (Push button)
- 🌿 Create/switch branches (branch dropdown)
- 📊 View history (History button)
- ⚙️ Advanced operations (gear menu)
Tip
Keep the Git pane open while working
Important Git Concepts
The Sacred Order
Always: Stage → Commit → Pull → Push
Never skip the commit before pulling!
- Stage your changes
- Commit with good message
- Pull to get remote changes
- Push your commits
Why this order?
- Pulling after committing preserves your work
- Git can merge changes intelligently
- If conflicts arise, you can resolve them
- Your work is never lost
Merge Conflicts
What causes conflicts?
Two people edit the same lines in the same file
Example scenario:
You: Edit line 10 of
analysis.R, commitCollaborator: Edit line 10 of
analysis.R, push to GitHubYou: Try to push → Conflict!
You: Pull → Git says “fix conflicts”
You: Open file, see conflict markers:
You: Choose which to keep (or combine), save, commit, push
Handling Conflicts
Branches (Optional but Powerful)
Branches let you work on features independently
gitGraph
   commit
   commit
   branch feature
   checkout feature
   commit
   commit
   checkout main
   commit
   merge feature
   commit
mainbranch = stable version- Create feature branch for experiments
- Work freely without breaking main
- Merge back when ready (or delete if failed)
Collaboration with GitHub
Inviting Collaborators
For private repositories:
- Go to repository on GitHub
- Click “Settings”
- Click “Collaborators”
- Click “Add people”
- Enter their GitHub username
- They’ll receive invitation email
For public repositories:
- Anyone can see and fork
- Control who can directly push
Collaborative Workflow
Good practices:
✅ Communicate about who’s working on what
✅ Pull before starting work
✅ Commit small, logical changes
✅ Push regularly
✅ Write clear commit messages
✅ Review each other’s code
✅ Use branches for big changes
Avoid:
❌ Both editing same file simultaneously
❌ Committing large files (>100MB)
❌ Waiting days between pushes
❌ Vague commit messages
❌ Pushing broken code to main
❌ Force pushing (unless you know why)
Working Solo? Still Use Git!
You’re collaborating with future you
- Track your thought process
- Experiment without fear
- Document decisions in commits
- Build portfolio of work
- Practice good habits
- Publish your research code
Tip
Start with private repos until comfortable, then make research public
Common Git Scenarios
Scenario 1: Made Changes by Mistake
Scenario 2: Want to Try Something Risky
Use a branch!
- Create new branch:
experimental-analysis - Make changes, commit as usual
- If it works → merge to main
- If it fails → delete branch
You preserved the working main branch
Scenario 3: Forgot to Pull Before Committing
- Don’t panic
- Try to pull anyway
- Git will usually merge automatically
- If conflicts → resolve them
- Commit the merge
- Push
Lesson learned: Pull → Commit → Push
Scenario 4: Accidentally Committed Sensitive Data
Sensitive Data Includes:
- Passwords
- API keys
- Personal information (emails, addresses)
- Confidential data
Prevention:
- Use
.gitignorefile - Never commit passwords (use environment variables)
- Keep sensitive data separate
If you did commit:
- Change passwords immediately!
- Rewrite Git history (advanced) or just make repo private
Advanced Topics (Brief Overview)
.gitignore File
Tell Git to ignore certain files:
# R files
.Rproj.user
.Rhistory
.RData
.Ruserdata

# Large data
data/raw/*.csv
data/raw/*.dta

# Outputs (regenerate from code)
figures/*.png
output/*.html

# System files
.DS_Store
Thumbs.db

# Sensitive
config/passwords.txt
.env
Tip
Every R project should have a .gitignore file
GitHub Features
Issues
- Track bugs
- Plan features
- Discuss ideas
- Assign tasks
Pull Requests
- Propose changes
- Code review
- Discussion
- Quality control
Releases
- Tag versions (v1.0, v2.0)
- Provide downloads
- Document changes
GitHub Pages
- Free website hosting
- Perfect for documentation
- Publish research websites
Git with Large Files
GitHub Limits
- Individual files: 100 MB max
- Repository: 1 GB recommended max
Solutions:
- Don’t commit large data files
- Use data repositories (OSF, Dataverse)
- Download data via script
- Use Git LFS (Large File Storage) for essential large files
- Store processed/aggregated data instead of raw
Command Line Git (Optional)
RStudio GUI covers 90% of needs, but CLI is powerful:
Note
Learn CLI gradually as you need advanced features
Putting It All Together
Your Complete Workflow
- Setup (once)
- Install R, RStudio, Git
- Create GitHub account
- Configure Git with your info
- Start Project
- Create repository on GitHub
- Clone to create R Project
- Set up directory structure
- Create .gitignore
- Daily Work
- Open .Rproj file
- Pull to sync
- Write code, analyze data
- Stage, commit regularly
- Push at end of session
- Collaborate
- Invite team members
- Communicate about tasks
- Review each other’s work
- Resolve conflicts together
Best Practices Summary
R Projects
✅ Always use R Projects
✅ Use relative paths
✅ Never use setwd()
✅ Organize files logically
✅ Document in README
Git Commits
✅ Commit often
✅ Write descriptive messages
✅ Commit logical units
✅ Pull before pushing
✅ Don’t commit generated files
Collaboration
✅ Communicate clearly
✅ Use branches for features
✅ Review code together
✅ Resolve conflicts promptly
✅ Keep main branch stable
Reproducibility
✅ Document dependencies
✅ Use relative paths
✅ Version control everything
✅ Make data acquisition reproducible
✅ Comment your code
Common Mistakes to Avoid
- ❌ Using
setwd()in scripts - ❌ Not using R Projects
- ❌ Committing sensitive data
- ❌ Vague commit messages (“updated stuff”)
- ❌ Pushing broken code to main
- ❌ Editing files on GitHub directly without pulling
- ❌ Waiting too long between commits
- ❌ Not backing up to remote (GitHub)
- ❌ Committing large data files
- ❌ Being afraid to experiment (that’s what branches are for!)
Resources and Help
- RStudio Cheatsheets
- R for Data Science (free online book)
- Posit Community
- Happy Git with R (excellent!)
- GitHub Docs
- Git Cheatsheet
- Stack Overflow (search first!)
- RStudio Community
- GitHub Issues for specific packages
Practice Exercise (Optional Preview)
Don’t Worry If This Seems Complex!
This is a preview of what we’ll practice in detail on Day 2/3. You’re welcome to try now, but no pressure!
Complete workflow preview:
Create new repository on GitHub called “r-practice”
Clone it and create R Project in RStudio
Create file
analysis.Rwith simple code:Stage, commit with message “Add first analysis”
Push to GitHub
Edit file, add:
print(summary(y))Commit with message “Add summary statistics”
Push again
View your commit history on GitHub!
Tip
Alternative: Just focus on creating the GitHub account and installing Git today. We’ll practice the workflow together on Day 2/3!
Next Steps
Course Roadmap
What we’ve covered today:
- ✅ Why R for research
- ✅ RStudio and Positron IDEs
- ✅ R Projects for organization
- ✅ Git/GitHub overview (concepts and setup)
Coming up next:
- Day 2/3: Deep dive into Git/GitHub workflows (hands-on practice!)
- Base R fundamentals
- Tidyverse approach
- Data wrangling techniques
- Creating visualizations
- Writing functions
- Reproducible research
Git Learning Path
Today: Understand what Git is and why it matters
Day 2/3: Master Git workflows with guided practice
Beyond: Use Git confidently in your research
Building Good Habits
Start small, be consistent:
- Use R Projects for everything (even small tasks)
- Commit early, commit often
- Write commit messages for future you
- Organize files logically
- Document as you go
- Push regularly (don’t lose work!)
- Experiment on branches
- Ask for help when stuck
These habits compound over time 🚀
Your Action Items
Before Next Session (Day 2/3)
Required:
- ✅ Install R, RStudio, Git (if not done)
- ✅ Create GitHub account
- ✅ Configure Git with your name and email (see slides)
Optional:
- ⭐ Try installing Positron if interested
- ⭐ Complete practice exercise (create repo, clone, commit, push)
- ⭐ Fork and clone course repository
- ⭐ Read Chapter 1-2 of “R for Data Science”
Save for Day 2/3:
- Deep Git/GitHub practice
- Collaborative workflows
- Troubleshooting together
Focus Today
Get your tools installed and accounts created. We’ll learn Git by doing on Day 2/3!
Questions?
Let’s discuss any questions or concerns
Thank You!
Contact:
- 🌐 zahid.quarto.pub
- 📧 zasghar@qau.edu.pk
- 🐦 zahedasghar
- 💻 github.com/Zahedasghar
Course Materials:
- 📚 github.com/Zahedasghar/d4d